
How to Trim a Tree Yourself: Safe Cuts, Tools, and Timing
The short answer on how to trim a tree safely is this. Wait for the dormant season, which is late winter to early spring in the Pacific Northwest. Remove dead, damaged, diseased, and rubbing branches first. Make every cut just outside the branch collar with sharp tools. Take large branches off in three cuts so the bark cannot rip, and never remove more than 25% of the living canopy in one season. Anything thicker than about 4 inches, near a power line, or out of reach from the ground is a job for a professional.
Most tree damage starts with good intentions. Homeowners cut flush to the trunk, leave long stubs, top a tree to make it shorter, or take a third of the canopy in one afternoon. The tree survives for a while. Then it sends up weak sprouts, rots at the wounds, or drops a limb in the first winter storm. Alexa's Tree Service has trimmed trees for homeowners and businesses around Vancouver, WA, and Portland, OR, since 2006.
This guide walks you through the job in five steps: timing, tools, planning, cutting, and cleanup. Before the steps, you will learn which jobs to leave alone. You will also get tables for timing and tool choice, a three-cut method you can follow on any large branch, and a list of the mistakes that hurt trees most.
Why trim a tree and when to leave it to a pro
You trim a tree to keep it safe, healthy, and well shaped, not because it needs a yearly haircut. A mature tree should be trimmed only when there is a reason, so settle the reason before you pick up a tool.
Trimming vs pruning
People use the two words interchangeably, and the tools and cuts are the same. Arborists tend to say pruning for selective cuts that improve health and structure, and trimming for shaping, size control, and clearance. This guide treats them as one skill.
The difference that matters is selective versus indiscriminate. A selective cut removes a chosen branch back to a proper point. Shearing a tree into a ball or chopping off its top wounds it in dozens of places, and those wounds rarely close well. Frequent heavy cutting also pushes the tree to grow weak watersprouts , which means more work for you every year.
Good reasons to trim
Mature trees do not need regular trimming. Young trees, with branches under about 3 inches thick, benefit from a little structural trimming so they grow one strong leader with well-spaced branches. After that, use the four D's to decide what comes off:
- Dead: scrape a small patch of bark. Green and soft underneath means alive. Brown and hard means dead.
- Damaged: broken, cracked, or torn branches that invite pests and rot.
- Diseased: spotted or wilted leaves, sunken or oozing patches, bark missing from a branch.
- Deranged: branches that cross and rub, or that scrape a fence, gutter, or roof.
Work in a fixed priority: safety first, health second, appearance last. Pruning for safety means branches that could fall on a house, car, or path. Pruning for health means the four D's. Appearance comes only after both are handled.
If a branch is not dead, damaged, diseased, or rubbing, it can usually stay.
Jobs to leave to a pro
Hand off the work when any of these apply:
- The branch is thicker than about 4 inches, or you need a chain saw to cut it.
- Any part of the tree is near a power line. Call the utility company. Pole pruners conduct electricity.
- You would need to climb the tree or work from a ladder with a saw.
- The tree leans, has a cracked trunk, hollow sections, or fungus growing at the base.
- A storm left broken limbs hanging in the canopy.
Professional trimming from Alexa's Tree Service is listed at $200 to $800+, depending on the size and condition of the tree. Compare that with an emergency room visit or a damaged roof. We offer free estimates, so you can have someone look before you decide.
Step 1. Pick the right time of year
The best time to trim most trees is the dormant season, and in the Pacific Northwest that means late winter to early spring, roughly February to March , before buds break. Dormant trees have no leaves to hide the structure, wounds close quickly once growth starts, and many tree diseases are less active.
Best months for most trees
The right window changes with the type of tree. Use this table as a starting point and confirm the details for your species.
| Tree type | Best window | Why |
|---|---|---|
| Most deciduous shade trees (maple, ash, birch) | Late winter to early spring, before buds open | Bare branches show the structure, and wounds close in the next growing season |
| Conifers (fir, pine, spruce) | Any time, dormant season preferred | Less sap and resin flows from the cuts |
| Spring-flowering trees (dogwood, redbud) | Right after the flowers fade | Flower buds form the year before, so late cuts remove them |
| Summer or fall flowering trees | Dormant season | Flower buds form on new growth |
| Crabapple, hawthorn, pear | Dormant season only | Pruning at other times can spread fireblight |
| Dead or broken branches | Any time | Removing them never costs the tree anything |
Months to avoid
Skip trimming in the heat of summer. A tree opened up suddenly to full sun can get sunburned, and the damage kills the growing tissue on the limbs. Never trim a drought-stressed tree, whatever the month. Dry summers are normal in this region, so water the tree well and leave the saw in the shed until it recovers.
Fall is also a weaker choice. Wet weather helps fungal spores spread, and fresh wounds are easy entry points. The same goes for oaks and elms, which attract beetles that carry serious diseases to fresh cuts. Check local guidance before you cut either one.
Trim in February or March, and trim in summer or fall only for dead or dangerous branches.
Step 2. Gather sharp tools and safety gear
Match the tool to the branch thickness, keep every blade sharp and clean, and wear protective gear. A dull blade crushes tissue instead of cutting it, and a tool too small for the branch twists and tears the bark.
Match the tool to the branch
You need very few tools for a small tree. Start with bypass hand pruners, a small pruning saw, and loppers.
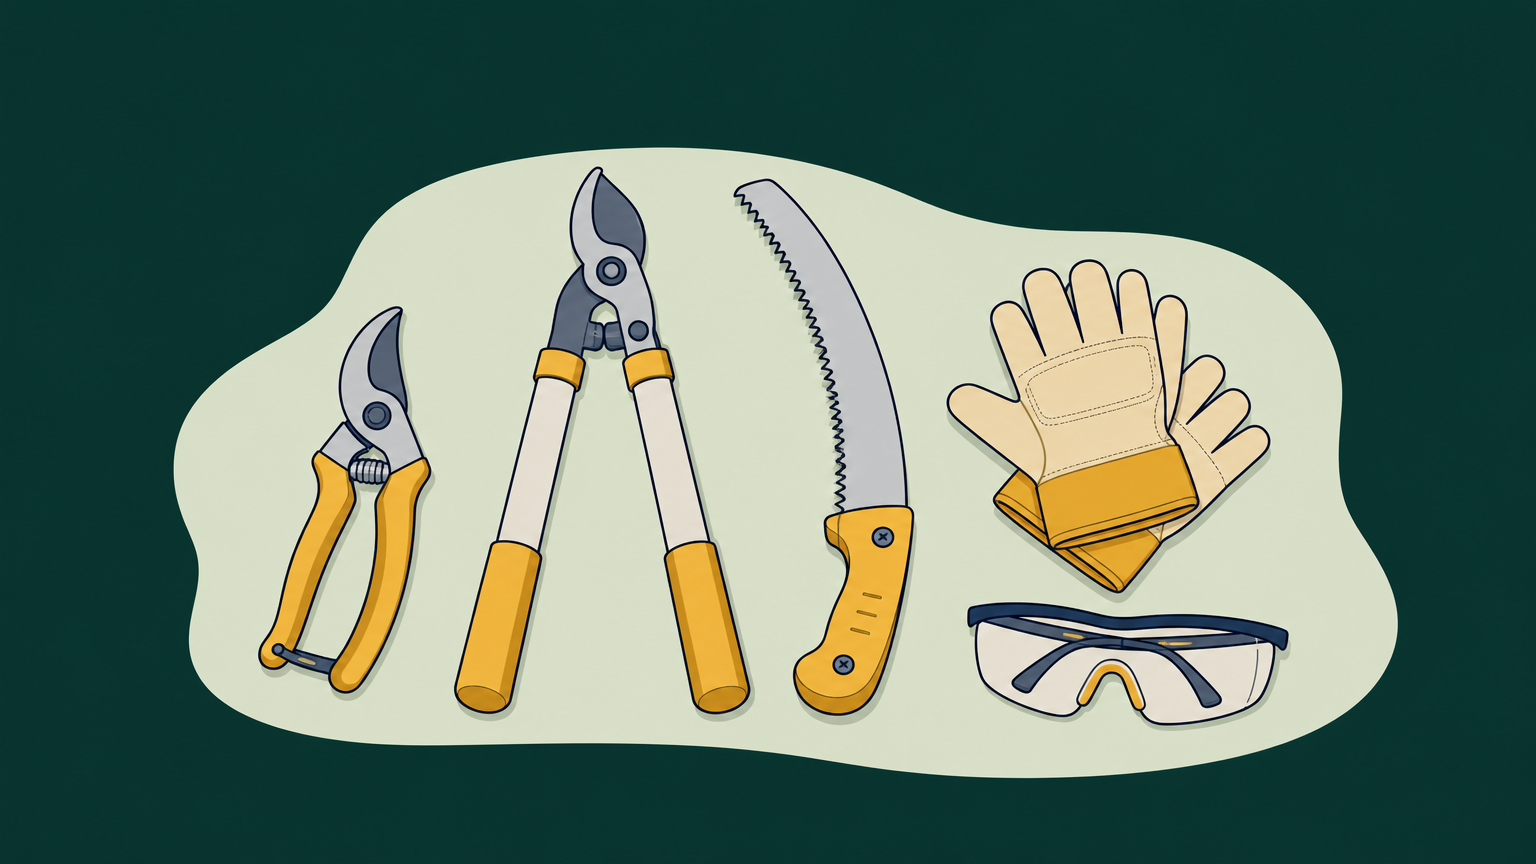
| Tool | Cuts branches up to | Notes |
|---|---|---|
| Bypass hand pruners | About 1 in | Blades slide past like scissors. Avoid anvil style, which crushes the branch |
| Loppers | About 2.5 in | Extra leverage for branches pruners cannot handle |
| Pruning saw | About 4 in | Cuts on the pull stroke. A curved blade of 6 to 13 inches works well |
| Pole pruner | About 1.75 in | For branches overhead. Gives you less precision. Stay far from power lines |
| Chain saw | Over about 4 in | For trained users only. Hire a pro instead |
Buy mid-range tools if you trim once a year. Spend more only if you plan to work in the yard often, because good tools last longer and cut cleaner.
Sharpen, sanitize, and suit up
Sharpen pruners and loppers with a sharpening stone before the season starts. Pruning saws are usually replaced or professionally sharpened. If you are cutting diseased wood, sanitize your blades between cuts . Dip them for one to two minutes in 70% denatured alcohol or in household bleach diluted one part bleach to nine parts water. Wipe off wood particles, and rinse and oil the tools afterward, because bleach corrodes metal.
Wear the following before you start:
- Thick work gloves
- Safety glasses, especially when you cut inside the canopy
- Long sleeves and pants
- A hard hat if you work under overhead limbs
- Hearing protection with any motorized tool
Stand to the side of each cut, never directly under the branch. Keep your free hand away from the blade, and check that nobody is in the drop zone.
A sharp, clean, correctly sized tool does half the work of a good cut.
Step 3. Plan which branches to remove
Plan the whole job before you cut: set a removal limit, walk around the tree, and decide on every branch. Planning keeps you from the most common DIY error, which is removing too much because the first cut looked easy.
Set your limit before you cut
Never remove more than 25% of the living canopy in one season. Younger, vigorous trees tolerate more, but older trees do better closer to 10%. If a tree needs more work than that, spread it over successive years. Heavy removal shocks the tree and triggers a flush of weak, fast sprouts.
For raising the canopy to clear a walkway or driveway, keep live branches on at least two-thirds of the tree's height. On a 30-foot tree, that means living branches on the upper 20 feet, so you can clear only the lowest 10 feet. Stop there even if the tree still feels in your way.
Choose branches in this order
Stand back and look at the tree from several sides, then work through this list:
- Remove dead, broken, and diseased branches.
- Remove branches that rub or cross another branch. Keep the better one.
- Pick a central leader if two stems compete, and take off the weaker one.
- Remove branches attached at narrow, V-shaped angles, which trap bark between them and split easily. Keep wide, U-shaped attachments.
- Remove sprouts at the base of the trunk and watersprouts along the branches.
- Clear lower branches only as far as your canopy limit allows.
Stop after each group and look at the tree again. Many trees need less cutting than you expect once the first three groups are gone.
Check the size of each branch
Before you cut, judge each branch by thickness. The thicker the branch, the larger the wound and the slower it closes.
| Branch diameter | What to do |
|---|---|
| Under 2 in | Go ahead |
| 2 to 4 in | Think twice and make sure the reason is a good one |
| Over 4 in | Have a strong reason, and consider hiring a professional |
Decide what comes off before you cut, and never take more than a quarter of the canopy.
Step 4. Make each cut correctly
Every cut goes just outside the branch collar , the slightly swollen ring where a branch joins its parent stem. Cut there and the wound is small and seals quickly. Cut too close or too far away and the tree pays for it for years.
Locate the branch collar
Look at the base of the branch. The collar is the bulge on the underside, and a ridge of bark called the branch bark ridge runs along the top where the branch meets the stem. Start your cut just outside that ridge and angle it slightly down and away from the trunk, without damaging the collar.
Avoid two errors. A flush cut goes inside the collar, which injures the stem and leads to decay. A stub cut leaves a long piece of branch, which dies back and delays healing. For a branch under an inch, one clean cut with sharp bypass pruners is enough.
Cut large branches in three steps
A heavy branch tears strips of bark off the trunk as it falls. The three-cut method prevents that. Use it on anything you cannot hold with one hand.
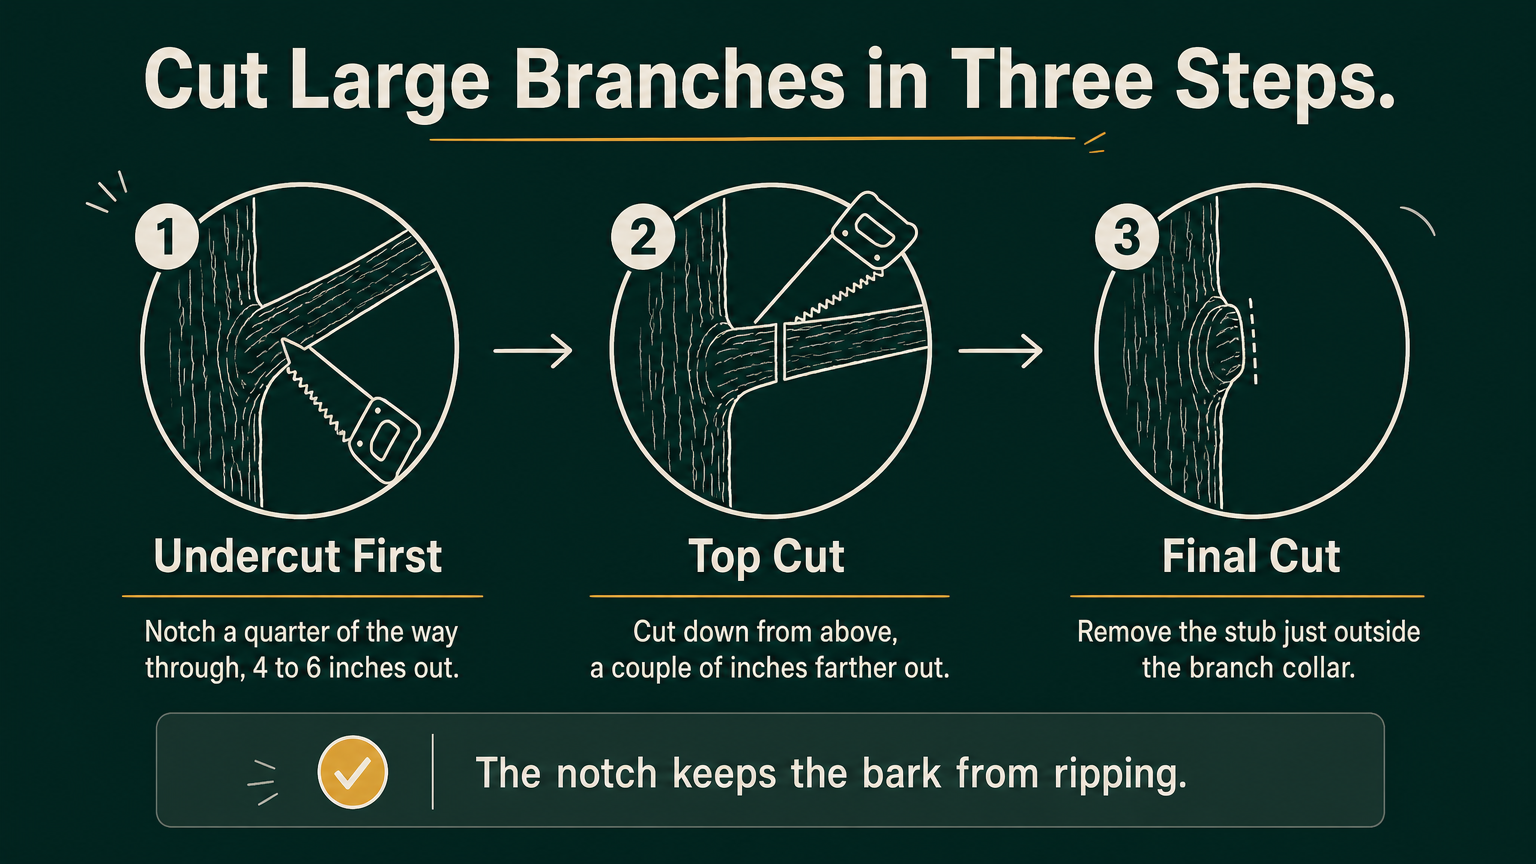
- Undercut: about 4 to 6 inches out from the trunk, saw a notch a quarter of the way through the underside of the branch.
- Top cut: a couple of inches farther out, cut down through the branch from above until it drops. The notch stops the bark from ripping.
- Final cut: remove the remaining stub just outside the branch collar, angled away from the trunk.
Support the branch with your free hand when it is light enough, and keep your footing firm. For a high branch, call a pro.
Shorten a branch or reduce height
To shorten a branch, cut back to a side branch that is at least one-third the diameter of the branch you are removing. Make the cut at a slight angle just beyond that side branch's collar. Cutting back to a smaller side branch or to the middle of a branch leaves stubs that die back or produce a tuft of weak sprouts.
A tree that has grown too tall is the hardest case. Do not top it by cutting the main stems between branches. If you need to reduce height, shorten the tallest limbs back to suitable side branches over several years. If more than half of a branch's foliage must go, take the whole branch out. A tree that has outgrown its spot is often better removed and replaced with a smaller species.
Cut outside the branch collar, never flush and never leaving a stub.
Step 5. Clean up and avoid common mistakes
Finish by cleaning the debris and your tools, and resist the urge to seal the wounds. Then check your work against the list of mistakes below, because most tree damage comes from a handful of repeated errors.
Finish the job
Leave pruning cuts uncovered. Wound dressings and paint do not stop decay, and they can trap moisture and slow the natural closing of the wound. The exceptions are specific to oaks and elms in disease-risk seasons, where local guidance may call for dressing. Sap flowing from a cut looks messy but does no harm in small amounts.
Clean up promptly. Drag branches clear, cut them into manageable lengths, and chip or haul away the waste. Wipe your blades dry, oil them, and store them clean. Then wait a season. A proper cut grows a concentric ring of new tissue around the wound, and a ring that is lopsided or missing tells you where your technique needs work.
Mistakes that hurt trees
| Mistake | What happens | What to do instead |
|---|---|---|
| Topping | Cuts large stems between branches. The tree grows weak sprouts, and the wounds rot | Reduce height gradually, or replace the tree |
| Tipping | Cuts lateral branches between nodes and leaves stubs | Cut back to a suitable side branch |
| Flush cut | Injures the stem and invites decay | Cut just outside the branch collar |
| Stub cut | Delays healing and allows fungi to enter | Trim the stub back to the collar |
| Lion's tailing | Strips the inner branches and leaves a tuft at the end, which sunscalds and breaks | Thin evenly along the branch |
| Over-removal | Stresses the tree and triggers watersprouts | Stay under 25% per season |
Plan the next trim
Most mature trees need attention only every few years, and only when you can name the reason. Young trees benefit from a quick check each winter. Walk around after storms, look for new dead or rubbing branches, and handle them in the next dormant season. If the tree is large, diseased, or close to a structure, a maintenance plan with seasonal checks is cheaper than emergency work later. Alexa's Tree Service offers tree care and maintenance plans that cover seasonal pruning and preventive health checks.
The trim that helps a tree is small, selective, and rarely needed every year.
Trim with a plan
Trimming a tree well comes down to a few habits. Trim in late winter, use sharp tools sized to the branch, and decide what to cut before you start. Cut just outside the branch collar, use the three-cut method on heavy limbs, and stop at 25% of the canopy. Leave topping, flush cuts, and wound paint alone, and leave big, high, or power-line jobs to someone with the training and equipment.
If a tree is beyond your comfort level, get a free estimate from Alexa's Tree Service. We will look at the tree, tell you what it needs, and handle the cleanup when the work is done.